Last updated on August 10, 2022
The iPod Nano brings a lot of great memories for many of us, which is why it’s sad that this Apple device was discontinued back in 2017 – along with the iPod Shuffle. For those of you who still own this gem of a device, consider yourselves lucky because we will most likely never see a new model of this precious device. If you’ve been contemplating whether or not you should take that Nano out of your storage and bring it back to life but aren’t sure how you will add your latest favorite tracks to it, we’re here to help you figure out how to put music on an iPod without iTunes!
The problem with iTunes is that it can be complicated to use, even for those of us who consider ourselves moderately tech-savvy. The process is excruciatingly time-consuming and the results don’t always work in our favor. What’s worse is that you have to go through more than a dozen steps to convert audio formats not natively supported by iTunes and then wait another long period for the songs to synchronize to your iPod.
Mac owners can’t even think about using iTunes now as this tool has been disabled for Mac users and only those who own a Windows PC can use this software. Fortunately, however, Softorino’s desktop tool called WALTR PRO, which is inspired by the Breaking Bad character, has all the answers for us.
Before we dive into the many benefits of using WALTR PRO on your Mac or Windows PC, let’s learn how to put music on an iPod without iTunes with the help of this revolutionary software.
How Can You Add Music to Your iPod Nano Without iTunes?
As mentioned earlier, iTunes is not preferred by most Apple device owners as it can be tricky to use and can also hog most of your time. On the other hand, you might also come across several online conversion and transfer tools for your iPod but their reliability and efficiency are questionable – to say the least.
WALTR PRO, on the other hand, has explicitly been made to make things easier for iOS users. The tool automatically converts several audio tracks to an iOS-friendly format within a couple of minutes, if not a few seconds, and enables users to directly transfer all their selected tracks to their Apple devices.
Unlike other apps on the market, it supports bulk conversions and transfers and also adds the missing metadata to audio files, including the tracks’ original album art.
Here’s how the tool works:
Step # 1: Downloading and Installing the Tool
Open Softorino’s official website from your Windows PC or Mac and download the free trial version of WALTR PRO. You can convert and transfer unlimited audio files during the trial version and if you’re satisfied with the tool’s functions and features, you can go ahead and invest in its budget-friendly license.
Next, you’ll have to install the software on your laptop and watch the initial onboarding video to get an idea of how WALTR PRO works. Once you’ve watched the onboarding video, you will be asked to enter your email address. You will receive a trial key on the email address you provide and, once you enter that into the relevant field, you can proceed with your free trial version.
Step # 2: Connecting Your iPod Nano To Your Laptop

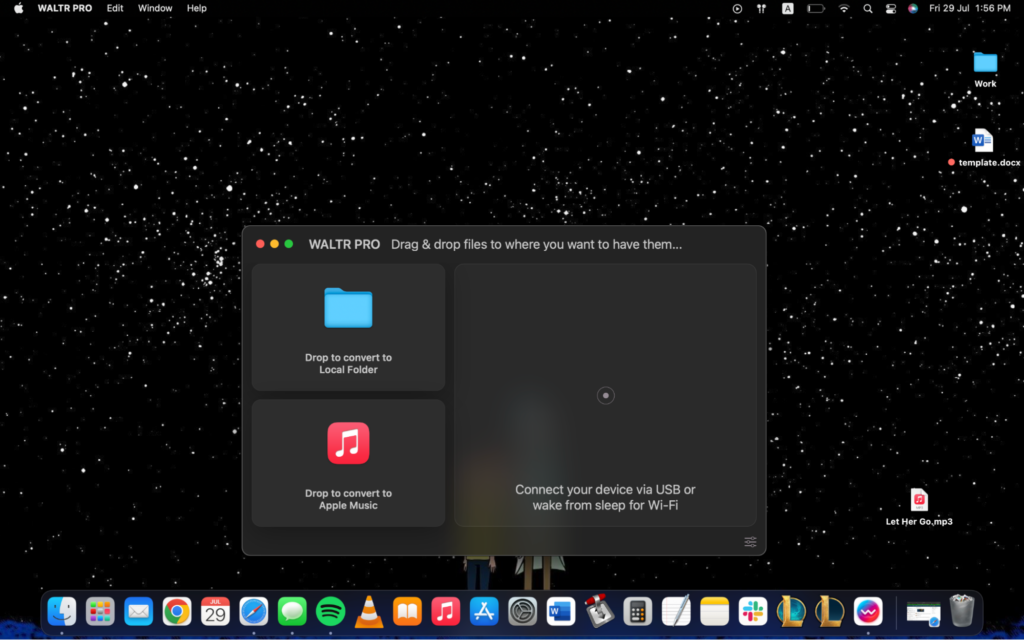
Given that you’re here to learn how to put music on an iPod without iTunes, you will be required to connect your iPod Nano to your laptop using its USB cable. On the contrary, you can skip this step and just save the converted files on your laptop.
It is also vital to note that you will only need to connect your device through a USB cable for the first transfer, after that, you can transfer all your files via Wi-Fi – given that your laptop and iPod Nano are connected to the same network.
Once you’ve connected your iPod Nano, head to the settings wheel in WALTR PRO and click on the Enable WiFi Connectivity option. Once you’ve turned this on, you can transfer the tracks to your iPod Nano over Wi-Fi, without having to use a USB cable.
Step # 3: Dragging and Dropping
Unlike other tools that only claim to make our lives easier but end up being inefficient and unreliable, WALTR PRO delivers on its promises with commendable output files and a convenient drag-and-drop mechanism.
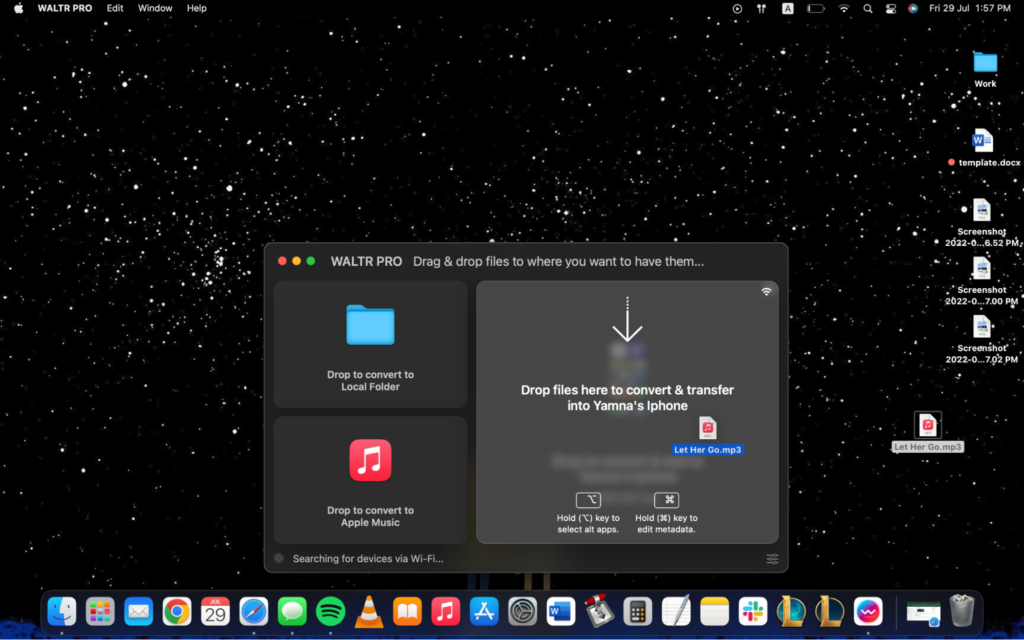
You can choose Select Files on WALTR PRO to browse through your files manually and pick them through the WALTR PRO window or simply drag and drop them into the window. Once you drag and drop the files, the conversion and transfer process will start immediately.
Select your iPod Nano from the list of devices and hit the Convert and Transfer button. The whole process will only take a few seconds to a couple of minutes – depending on the conversion and transfer size. Until then, you can sit back, relax, and rest assured that all your files will be in an iOS-friendly format and will end up in your Music Library on iPod Nano.
Why Is WALTR PRO Receiving Raving Reviews?
We’ve already established that WALTR PRO is one of the most trustworthy and efficient tools in the market for iOS-related conversions and transfers. It’s super-fast, convenient, and time- and cost-efficient as well. But there’s more to this software than meets the eye!
The following are some other reasons to fall in love with WALTR PRO:
- You can use Wi-Fi to transfer all your converted files
- You can easily edit the destination of your output files
- It comes at a minimal cost but offers several fun features
- The drag-and-drop mechanism makes conversions and transfers a piece of cake
- You can avail several customization features through WALTR PRO
How Can You Download and Transfer Music from YouTube?
YouTube is the ultimate go-to for music lovers because the app contains all the new tracks from our favorite artists. However, sometimes it becomes a hassle to download songs from YouTube, convert them to an iOS-friendly format, and transfer them to an Apple device.
Fortunately, Softorino has listened to our concerns and has delivered one of the best tools for this as well. From songs to audiobooks and podcasts, you can download anything from YouTube and transfer them to your Apple device for an uninterrupted listening experience on your Music app with Softorino YouTube Converter 2 [SYC2].
This app is available for both Mac and Windows PC users and makes the process of downloading, converting, and transferring YouTube songs completely hassle-free. Here’s how SYC2 works:
Step # 1: Download and Install SYC2
Download the free trial version of the software, which offers 24 hours of unlimited conversions and transfers. Once the download is complete, install SYC2 on your Windows PC or Mac and enjoy a full day of easy YouTube to iOS conversions and transfers.
If you’re happy with the results, you can also invest in its cost-efficient license and opt for a monthly, annual, or one-time payment plan.
Step # 2: Find Your Favorite Tracks on YouTube
With a built-in browser, SYC2 takes away the hassle of opening another window to locate music on YouTube. You can simply search for your favorite tracks on YouTube by typing the name of the song and artist in the search bar in SYC2. Once you press enter, you will see the top results from the website in the built-in browser.
Select the video that you want to convert to an iOS-friendly format and transfer it to your iPod Nano. You will see the Add to Queue option at the top of the browser after clicking on a specific song, press this option, and the song will be added to the queue of files to be converted and transferred.
Repeat this step for as many YouTube songs as you like. You can also browse other music streaming websites, such as SoundCloud, Vimeo, and MixCloud.
Step # 3: Convert and Transfer Songs to Your iPod Nano
When you’re happy with the list of songs added to the queue through the built-in browser, you can go ahead and tweak the conversion and transfer settings according to your liking. If you’re looking for audio files that will end up in your iPod Nano’s Music library, you’ll need to select Audio under the Convert To option.
Under Audio, select a format from the three available options; Original, MP3, and AAC, and then select your iPod Nano from the list of devices under the Save To option. Finally, hit the Convert and Transfer to iPod button at the end of the window.
You won’t need to open any third-party apps or tools and all your selected YouTube songs will be converted to an iOS-friendly format and transferred to your iPod Nano without any extra steps.
In Conclusion:
The iPod Nano is still an amazing device, especially if you’re looking for ways to save some storage space on your phone and laptop. You can listen to music for hours on end without any interruptions with excellent sound quality.
We hope this guide on how to put music on an iPod without iTunes has helped you finally make up your mind about taking out your old iPod Nano, dusting it off, and getting ready for some jamming sessions! If you want to learn more about Softorino and its revolutionary tools, head to its official website now!